How to place the fingers
There are two fundamental things for learning chords: 1) which strings to press down on which fret positions; 2) which fingers are involved and the placement of them. The first subject is presented in diagrams all over the site, here we focus on the second matter.
Fingerings (finger position)
Fingerings refer here to how to organize your fingers in a chord position. Often this comes naturally and in some cases it's almost physically impossible to use more than one specific fingering.
There is sometimes more than one correct fingering for a specific chord. There are occasions when it's suitable to have a certain finger free that normally is used for that specific chord. The reason is for simplifying the movement to the next chord or to use the free finger for embellishments.
It's still beneficial to know some general guidelines concerning right fingerings and how to switch between chords.
- For natural reasons your index finger belongs on the left and at the top on the fretboard (referring to a standard build guitar).
- The little finger is often left out in chords that require three fingers.
- The little finger and index finger are often left out in chords that require only two fingers.
- As often as possible, you want to have a free finger in front of the rest (i.e. in the direction to the body of the guitar). This is because you want to have the free finger for your disposal in favor of transitions to sus chords, for using techniques as hammer-ons or for the sake of other embellishments.
As said before, the fingerings are often situational. One example: D minor in standard open position (XX0231) is often played with the fingers 1,2 and 3, but if the next chord is Bbmaj7 in typical barre position (X1323X), it's better to use the 4 than the 3 finger. In that case the 4 finger can stay on the same place in the chord change.
If you want to see some chord examples with fingering suggestions written out, go to easy chords.
Don't mute adjacent strings
To make your guitar playing sound well, it's a must that you play clean (at least if this is the musical intention). When playing chords, you should always be sure of that all strings (included in the chord) are ringing out and and are not muffled in any way. It can easily happen that one of your fingers touch an adjacent string and thereby muting it.
To check that all strings ring out in your chord, you can control this by playing one string at a time. By doing this, you will hear if some string is muted because of a finger touching it. A tip for avoiding this, is to curve your fingers.
Even among the most common chords, this can be a tricky issue. For example for the shape of C Major in open position, you may be touching the D-string with your ring finger (see picture below).
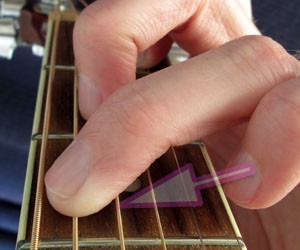
Try to position the ring finger far from the critical D-string
Another very common chord is G Major in open position. In this case some have difficulties not muting the A-string as their ring or index finger, depending on the fingerings, is touching it (see picture below).
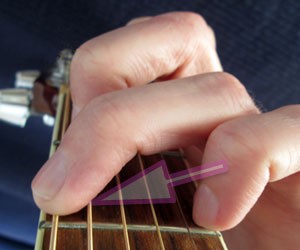
Try to position the ring finger away from the critical a string
Use fewer fingers
It is generally faster to fingering a chord with three than four fingers. If you have a choice, consider using fewer fingers. The method is usually to bar two strings with one finger instead for use two for the same job:
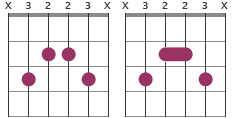
Four fingers can be three for the same chord.
The pictures above show the same chord with two fingerings. The first involves three fingers and the second only two.
Avoid fingertips pain
Some chord grips make the fingers tips pointing hard against the strings, for example open D major. If you feel pain when playing guitar, one thing to do is to search for alternative chord shapes in cases pain is experienced. Another thing is to change guitar, if that's an option for you; steel string guitars are much worse than nylon string guitars in this case. If you don't want to change guitar, you could avoid pain by special products such as Rock-Tips that with help of liquid makes your fingertips harder when you play.
How to increase your reach
There are chords that demand a big stretch for the fingers. The size of the hand is obviously one factor that decides what is possible, but there are some tricks that can help you reach further when you might think.
- If you move your thumb position (often by lowering it), it can often help you to get a better reach along the fretboard.
- Also, the position of your elbow can be moved and make your stretch capacity better.
Never do stretches that result in pain and try to warm-up before struggle with fingerings that involves big stretches.
The next thing to learn now is how to switch between chords.