Chord training – lesson 2
![]() The lesson involves a chord change where one of the fingers shouldn't be lifted. This can sometimes be hard and by anatomic reasons, the fingers will often follow other fingers.
The lesson involves a chord change where one of the fingers shouldn't be lifted. This can sometimes be hard and by anatomic reasons, the fingers will often follow other fingers.
Chord diagrams - first shift exercise
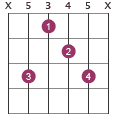
The task: don't lift the middle finger (2). Tip: pressing down the middle finger as a counter-force maneuver when shifting from the Cmaj7 to Cm6/9 will help you succeed.
Cmaj7
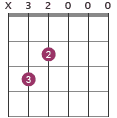
Cm6/9
Cmaj7 - Cm6/9
Extended progression:
Em7 - Cmaj7 - Cm6/9 - G6
Chord diagrams - second shift exercise
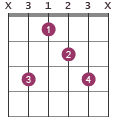
The task: don't lift the middle (2) or the little (4) finger. Tip: as before, press down the middle finger when shifting from the Cmaj7 to Cm6/9 will help you succeed.
Cmaj7
Dm6/9
Cmaj7 - Dm6/9
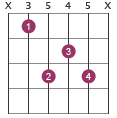
Extended progression:
Cmaj7 - Dm6/9 - Fmaj7 (XX3555)
<< Back to lessons overview